HealthCraft SuperPole 101: Installation & Assembly (Part 3)
How do you install the HealthCraft SuperPole in your home?
For any combination of SuperPole, support accessories, and installation hardware—the process for installation will follow these steps:
- Getting ready
- Determining your SuperPole’s placement
- Assembling your SuperPole and accessories
- Pressure-fitting your SuperPole between your floor and ceiling
This article provides detailed instructions for each step.
This article is the third in a three-part series called: HealthCraft SuperPole 101.
If you’ve bought a HealthCraft SuperPole (or you’re still thinking about buying one), you’ll probably want to know how to install it. But depending on which combination of features, support accessories, and installation hardware you’ve selected—the process can vary.
Luckily, we’ve compiled and answered the top 5 questions to help demystify the process of assembling and installing your SuperPole. If you follow the instructions in this article—regardless of your specific SuperPole configuration—you should be able to get yours set up safely and quickly.
Note: This article does not include instructions for the SuperPole Ultra (for ceilings over 120” tall).
If you have other questions about the SuperPole that haven’t been answered in this article, you may find answers in the other articles in this series.
Part 1 introduces the SuperPole System and explains its fundamental elements. If you’ve never heard of the HealthCraft SuperPole or you need a quick refresher, read it first.
Part 2 gives a detailed overview of the HealthCraft SuperPole’s various configurations, support accessories, and additional installation hardware. If you’re still trying to decide which SuperPole is right for you, check out Part 2.
If you don’t find answers to your specific question in any of these articles—please reach out to us!
We’ve built Part 3 so that if you read it in order, you’ll understand how to install almost any combination of SuperPole and accessories in your home. In this article, we’ll answer the following questions:
1. Do I need an installer for my SuperPole?
2. How do I install my SuperPole?
Step 1: Getting ready
Step 2: Figuring out your SuperPole’s placement
Step 3: Additional assembly
If you have an Angled Ceiling Plate
If you have a SuperBar and/or SuperTrapeze accessory
If you have a Unifit Extender
If you have a Ceiling Plate Extender
Step 4: Final Installation
3. Do I need to use screws to install my SuperPole?
4. Can I move my SuperPole after I have installed it?
1. Do I need an installer for my SuperPole?
Depending on your comfort level with installing products in general, you might want to have an access remodeler, contractor, or a handy family member install the SuperPole for you. If you’re feeling any stress about installing your own SuperPole, this is a great option!
If you decide to try installing yourself and you get confused, you can reach out to a member of our customer care team, and we can provide assistance or connect you with someone who can help.
2. How do I install my SuperPole?
The HealthCraft SuperPole isn’t complicated to install. In fact, seeing how quickly the SuperPole installs with its pressure-fit mechanism is almost magical—but because of the SuperPole’s various configurations and accessories—it’s easy to feel overwhelmed.
Luckily, we’ve broken SuperPole installation into 4 steps that should cover most combinations of poles, support accessories, and installation hardware.
Note: Installation for the SuperPole Ultra is not covered.
Step 1: Getting ready
In French cooking tradition, there is a core concept called, “mise en place,” which means—everything in its place. Before you start installing any SuperPole, it’s important to make sure that you have everything you will need to complete the installation process.
This includes collecting the necessary tools. You’ll need a screwdriver (doesn’t matter which kind), a stud finder, and optionally—if you plan on screwing your SuperPole to your ceiling—a drill.
You’ll also want to make sure you have all the parts for your SuperPole, any support accessories (SuperBar or SuperTrapeze), or additional installation hardware (Unifit Extender, Ceiling Plate Extender, or Angled Ceiling Plate). Refer to the parts list in each box and carefully check to see that nothing is missing.
Step 2: Figuring out your SuperPole’s placement
Arguably the most important step in SuperPole installation is deciding where it’s going. This decision is driven by 3 factors:
- Ceiling joist positioning
- 360-degree clearance around the pole
- Your specific support needs
We went into detail about ceiling construction in the second article in this series, but to summarize here—all SuperPoles need to either be placed directly underneath a single ceiling joist or between two ceiling joists with the ceiling plate underneath both of them.
If you don’t position your SuperPole with ceiling joists in mind, you’ll do serious damage to the drywall in your ceiling, and the pole won’t be secure.
Secondly, you want to make sure that you have clearance all the way around your SuperPole. This means making sure there are no obstructions or furniture covering the base of the pole. If
your SuperPole has a SuperBar attachment, make sure that it will be able to move freely all the way around the pole.
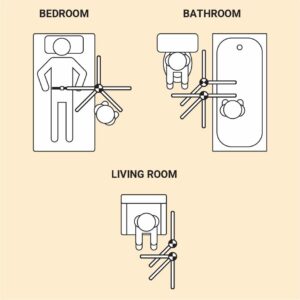
Finally, the placement of your SuperPole should be based on providing the most effective and useful support possible. An occupational therapist, doctor, or another member of your care team may have a place in mind for your SuperPole to maximize its benefit.
If you’re installing a SuperPole without consulting an occupational therapist—don’t worry! We outline some commonly recommended SuperPole placements in the previous article in this series.
Step 3: Additional assembly
If you have any additional support accessories or installation hardware for your SuperPole, you’ll want to build it on the ground before triumphantly hoisting it into its upright position.
If you don’t have any additional support accessories or installation hardware, and you’re just installing a SuperPole (Standard, Bariatric, or Custom Cut) on its own—skip to Step 4: Installation.
Otherwise, move through the following sections in order, but skip any part that isn’t included in your SuperPole setup. These steps are set up so that anyone can follow or skip through them in order without having to backtrack.
If you have an Angled Ceiling Plate
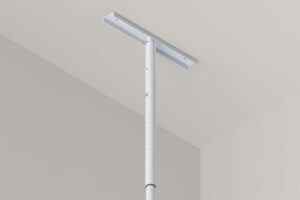
As mentioned in Part 2 of this series, the Angled Ceiling Plate must be secured with screws. Start by aligning the Angled Ceiling Plate parallel to a ceiling joist and screwing it in through the central holes on each side, as shown in the image above.
If you have a SuperBar and/or SuperTrapeze accessory
Any SuperPole support accessories (SuperBar and SuperTrapeze) must be assembled and installed to the pole before final installation. If you end up buying a support accessory after your initial SuperPole purchase and installation, you’ll need to dismantle your pole, add the accessory, and re-install your SuperPole (more on dismantling and reinstalling later).
The process for setting up any SuperPole support accessories is not complicated, but it does require some precision and attention to detail. If your SuperPole system includes either of them, read and follow the steps below closely.
Assembling and installing a SuperBar
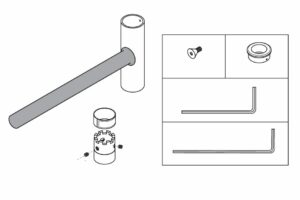
Your SuperBar out-of-the-box should include a T-bar assembly, a castellated collar assembly, and various hardware. Consult the parts list in the instruction manual to make sure you’re not missing anything.
Here are the steps for assembling and installing a SuperBar to your SuperPole:
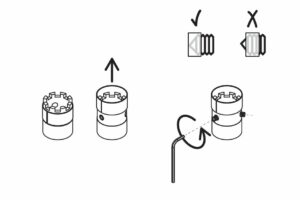
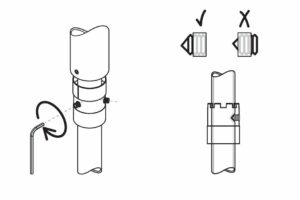
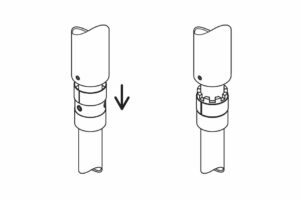
1. Slide the spring ring upwards on the castellated collar to expose its 3 set screws. Loosen the set screws with the hex key provided by turning counterclockwise until their points no longer protrude on the inside of the collar assembly.
This will allow the assembly to slide over your SuperPole without the set screws making contact or scratching its surface.
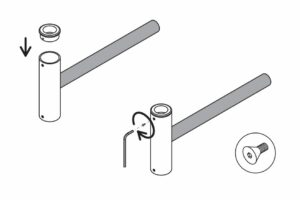
2. Insert a bushing on one side of your T-bar assembly and attach it using one of the screws provided. This will become the top side of your T-bar assembly.
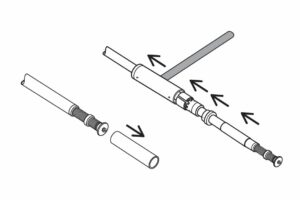
3. Temporarily remove the cover sleeve from the bottom of the pole assembly, then in this order, slide the T-bar assembly, castellated collar assembly, bottom bushing, and cover sleeve back onto the bottom of the pole.
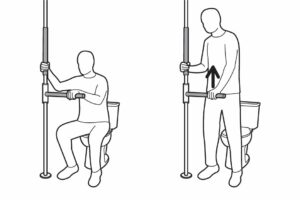
4. Make sure you know how you plan to position your SuperBar for optimal use. This includes both height and rotational positioning. For height, we recommend positioning the SuperBar just above your belt line in a standing position or near the base of your ribcage in a seated position.
If you’ll be sharing your SuperBar with someone significantly taller or shorter than you, you’ll need to compromise to find a workable height for both of you.
For rotational positioning, remember that the pivot and lock mechanism moves in eight 45-degree increments. In order to have the bar correctly in front of you during use, you need to make sure to align it correctly before securing it in place.
To do this, look at the holes at the top of your SuperPole. These holes will indicate how your SuperPole will align with its Ceiling Plate and your ceiling joist(s). Position the castellated collar assembly in relation to these holes so that its pivot positions are optimized for the space the SuperPole is in (no furniture obstructions), and for their specific use case (e.g. forward facing support in front of the toilet).
Note: You may find it easier to position your SuperBar and complete the following assembly steps after your SuperPole is upright.
5. Once you’ve determined the correct position for your SuperBar, tighten the 3 set screws on the castellated collar assembly so they bite into your SuperPole, securing the assembly in place.
Make sure the set screws are flush with the outside of the castellated collar and slide the spring ring down to conceal them.
Important: You must be absolutely sure about the positioning of your SuperBar before completing this step, because if you make a mistake and repeatedly puncture the pole, it can alter its shape and affect its functionality. Doing this will void the warranty.
If you are concerned about this step, you can contact us directly for advice or contact one of our dealers for help with installation.
6. Finally, lower the T-bar assembly onto the castellated collar, slide the bottom bushing up into the T-bar assembly, and attach them with the remaining screw.
Your SuperBar is now securely in position.
Assembling and installing a SuperTrapeze
Only part of the SuperTrapeze needs to be attached to your SuperPole before completing its assembly. In fact, it is much easier to finalize the position of the SuperTrapeze once the SuperPole is in position.
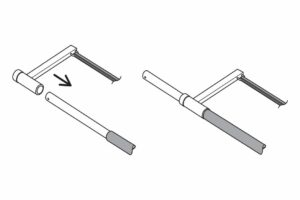
Before final installation, slide the support arm assembly onto the top of your pole with the strap hook facing towards the grip on the pole. Rest the assembly on top of the rubber grip.
After you install your SuperPole, you can find detailed setup and assembly instructions for your SuperTrapeze on pages 10 & 11 of this instruction manual.
If you have a Unifit Extender
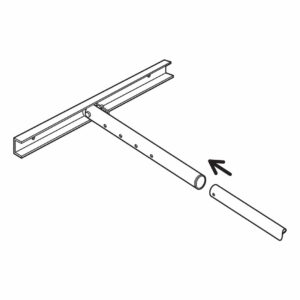
The Unifit Extender allows a SuperPole to be installed under ceilings between 100” and 120” tall. It is essentially a metal tube with five holes—one of which connects with the Ceiling Plate. The other four holes on the Unifit Extender each correspond with a 5” height range.
With the holes at the top, lower the Unifit Extender onto the top of the standard pole assembly. Align the holes on the standard assembly with the holes corresponding to the correct height range on the Unifit Extender and use the fasteners provided to secure the fitting in place.
If you have a Ceiling Plate Extender
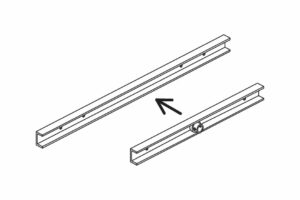
The Ceiling Plate Extender allows the SuperPole to be positioned between ceiling joists that are 24 inches apart. It fits directly over the standard Ceiling Plate.
To attach it, align the holes on the standard Ceiling Plate with the innermost holes on the Ceiling Plate Extender and use the fasteners provided to secure the fitting in place.
Step 3: Final installation
By this point, you’ve got your tools in front of you, you’ve made sure you’re not missing any pieces, you know where your SuperPole is going, and you’ve assembled (or partially assembled) your various accessories. It’s time to install your SuperPole!
Here are the SuperPole’s final Installation steps:
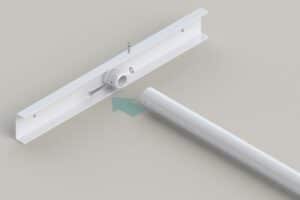
1. Attaching the Ceiling Plate: Regardless of what Ceiling Plate you have (Angled, Ceiling Plate Extender, Standard Ceiling Plate), the first step of installing your SuperPole is attaching the pole assembly to the Ceiling Plate.
Fit the top of your pole (or Unifit Extender) onto the bottom of your Ceiling Plate. Align the holes on each side and use the fasteners provided to secure the fitting in place.
Note: If you have an Angled Ceiling Plate, your SuperPole will hang from the ceiling at this point—but the next steps are roughly the same.
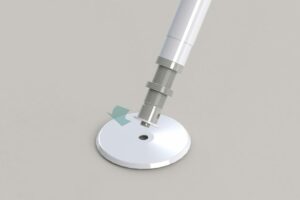
2. Aligning the Base Plate: Position the SuperPole’s Base Plate on the floor, directly underneath the ceiling joist(s), as planned.
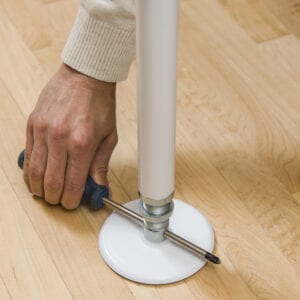
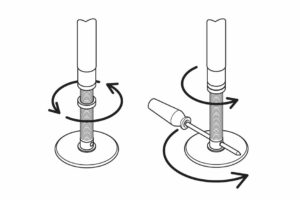
3. Securing the pressure-fit: While holding the pole assembly upright (you may want to enlist an extra set of hands), insert the shaft of your screwdriver horizontally through the drive hole at the base of the SuperPole’s jack extension screw.
Hold the pole and begin turning the jack extension screw clockwise to raise the Ceiling Plate so that it makes contact squarely with the ceiling joist(s).
Continue turning the jack extension screw for approximately 2 – 5 turns until the pole is secure. You want to turn it tightly enough that it won’t move, but not so tight that you hear your house crack—so you shouldn’t have to force it.
Leave the screwdriver in place and spin the lock nut counterclockwise until it touches the bottom of the pole. Rotate the lock nut and the jack extension screw counterclockwise together to lock the height of your SuperPole.
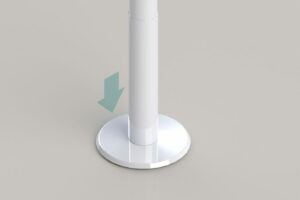
Finally, remove the screwdriver shaft and lower the cover sleeve to conceal the jack extension screw.
Note: If using an Angled Ceiling Plate, instead of raising the top of the pole to meet the ceiling, you’ll be lowering the bottom of the pole into the base—but you can still follow these instructions.
At this point, your SuperPole should be firmly in place. If you want to make it even more secure, you can use the screws provided to attach your Ceiling Plate to the ceiling joist(s). This added security measure is optional except in a few cases (see question 4).
If you’ve made it through these steps—congratulations! Your SuperPole is installed and ready to use!
3. Do I need to use screws to install my SuperPole?
Although the SuperPole is slated as a product with no drilling required, screwing your SuperPole to the ceiling is always an option for added security.
Different people use SuperPoles in different ways to meet their specific needs. If the user will be putting a significant load on the SuperPole, we recommend screwing it in if possible.
There are also a few cases where screws are absolutely required to safely install a SuperPole:
- With an Angled Ceiling Plate: As mentioned above, the Angled Ceiling Plate needs to be screwed into a ceiling joist for the SuperPole’s pressure-fit mechanism to work. If you’re installing a SuperPole under an angled ceiling, you’ll need to screw it in.
- If you use a power wheelchair: Power wheelchairs can weigh anywhere from 150 – 400 lbs. If your SuperPole isn’t screwed to the ceiling, the dynamic force of a power wheelchair hitting the pole sideways is enough to knock it out of place. Screws can greatly reduce or eliminate this risk.
- If regulations in your area require it: Certain regions require that floor-to-ceiling poles be screwed in to meet the building code. Consult your local building code requirements to find out the rules in your area.
4. Can I move my SuperPole after I have installed it?
Yes! The SuperPole can be taken down and moved to a new location as needed. If you’re not satisfied with its placement, you’re moving homes, or you decide you no longer need the product—you can dismantle the pole in 5 to 10 minutes.
First you need to unlock the jam nut, then unscrew the jackscrew. This process will lower the top of the SuperPole from the ceiling so it no longer makes contact. If you’re worried about this process, a contractor or home accessibility modification expert can take the product down and reinstall it for you.
Take caution, as the pole can feel quite heavy. If you’re unable to carry or hold over 10 lbs, we recommend having a second person assist you through the process. You can also refer to the installation instructions for guidance on how to safely take down a SuperPole.
More questions?
At this point, you should have a clear understanding of how to set up almost any HealthCraft SuperPole in your home (or your loved one’s home).
If you follow the steps in this article or the ones in the instruction manual you received with your order, you’ll be able to safely and securely use your SuperPole to stay safe and independent in your home.
If you have a question about the SuperPole that hasn’t been answered in this article, you may find answers in the other articles in this series.
Part 1 provides a primer about the SuperPole System and explains how it works, while Part 2 focuses on questions to help you choose the best combination of SuperPole, accessories, and hardware for your specific home safety needs.
If you’ve read all three pieces and still can’t find answers to your specific questions, please reach out to us directly and sign up for our mailing list. We’re committed to answering your questions and subscribers are the first to find out about updated answers and new articles (they also get access to exclusive discounts throughout the year).

