Grab Bars in the Shower: Placement and Selection
This 5 Step Guide will review where the supports should be in and around your tub or shower, how to select the right bar, and confirm that it will work for the whole family. Grab bar fixtures in your household bathroom do not need to adhere to commercial building code guidelines (like ADA). It is important to personalize them according to your height, shoulder range, and grip, so you can put support anywhere you need it.
As you can probably imagine, any changes that you make to your bathroom will probably need to last several decades. Lots can change in that time frame. You want your bathroom to be beautiful and functional for many years to come even as your aging parents and the grandkids start visiting. Aging in place means that you will have the ability to stay independent and have the freedom to enjoy life to the fullest, regardless of your age or medical condition.
In a separate article, we address where the grab bar supports should be around the toilet. However, there may be some supports that work in both areas (such as a clamp-on tub rail that helps you rise from the bottom of the tub as well as providing support as you rise from the toilet.
To help with placement and selection grab a tape measure, some painters tape (so it won’t mark your walls), a stud finder, and a broomstick or handle. If your situation is complex or you have a changing medical condition, contact an Occupational Therapist (OT). An OT will complete a Home Safety Assessment and recommend products and solutions. You might then work with a home accessibility renovator/remodeler who understands the modifications or renovations that will provide you with a safer home environment for years to come.
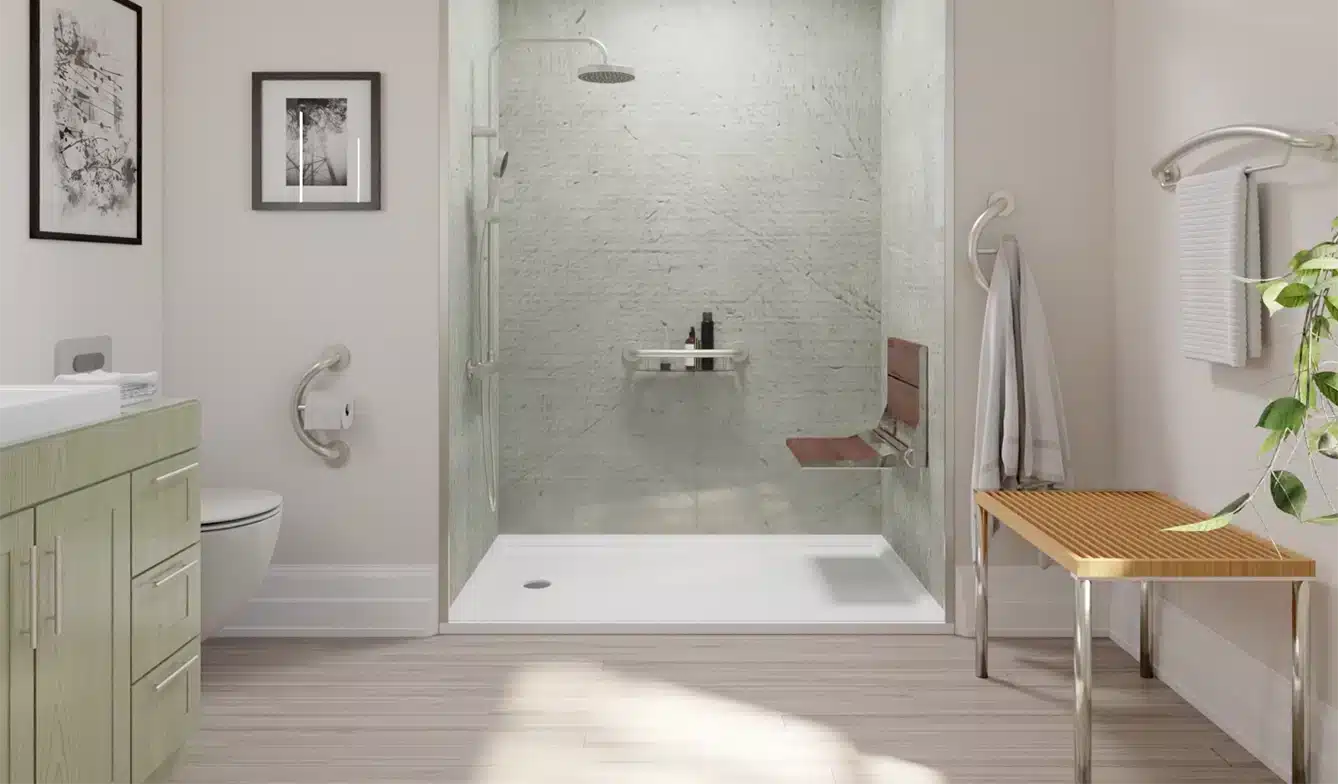
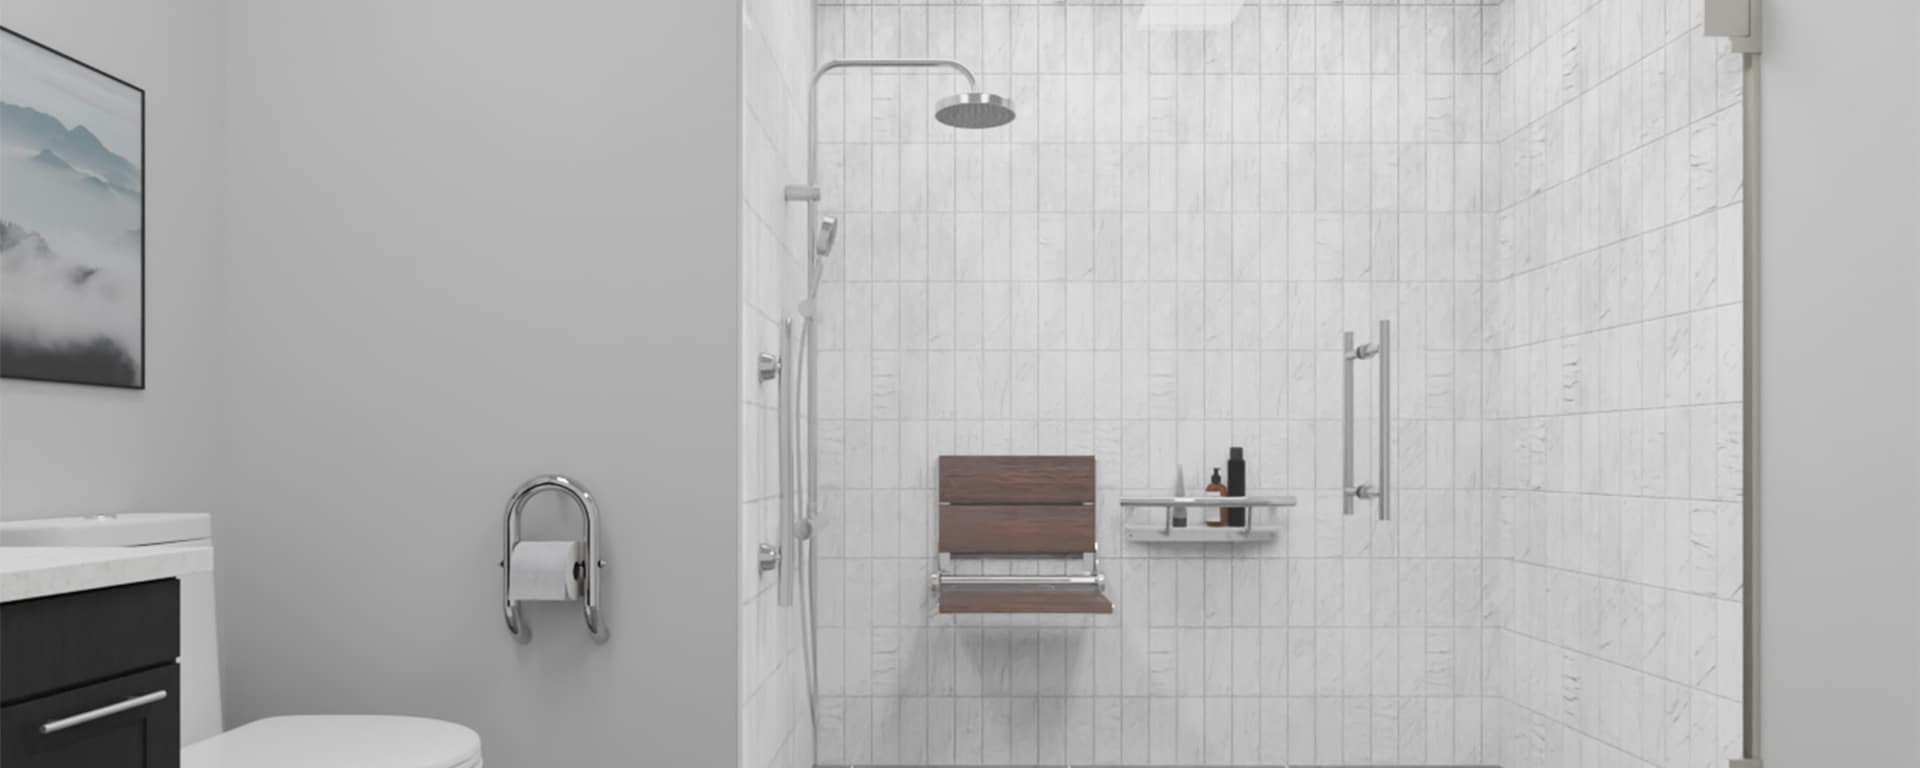
Tub/Shower
For basic fall prevention in the shower, at a minimum, we recommend two (2) grab bar fixtures. For advanced fall prevention in the shower, we recommend three (3) grab bar fixtures or more to provide additional balance and support. What can grab bars do for you in the tub/shower? They can help provide support while you:
- Lean over to turn the water on and off
- Step into or out of the tub/shower
- Get up from or down to the bottom of the tub
- Stand up or sit down onto a bath seat
- Lean to wash your legs and feet
- Have your eyes closed while shampooing or turning around during the shower.
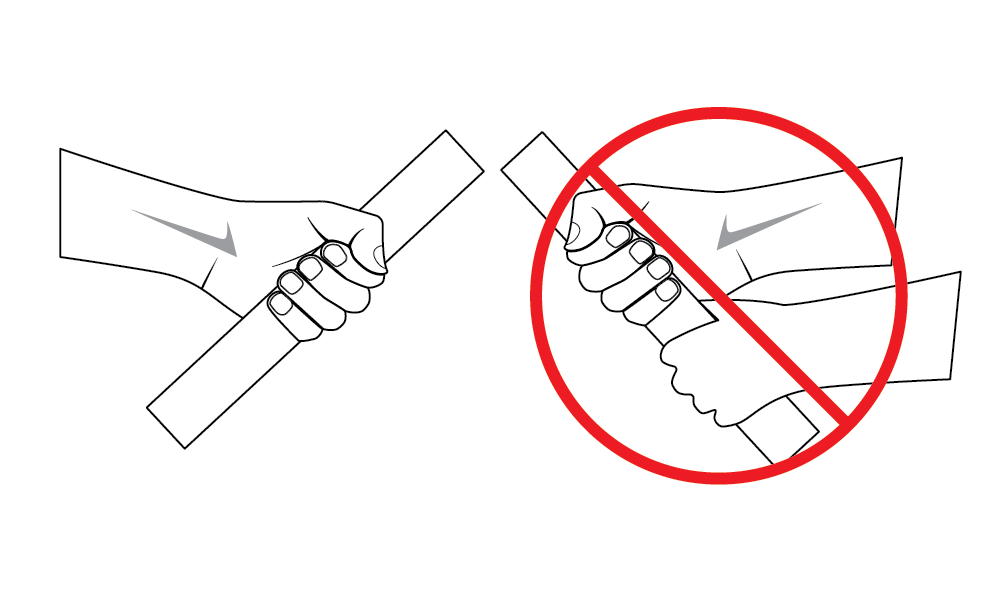
What is the 3-Point Contact Rule?
In industry and construction, the 3-point rule is a safety practice. 3 points of contact means that 3 of your 4 limbs are always in contact with a steady surface (either two feet and one hand or two hands and one foot). 3 points of contact are recommended for your safety when: walking up and down stairs, climbing into or out of trucks for example. The intent is to improve one’s balance and safety through 3 points of contact. What does the 3-point contact rule have to do with your tub/shower? Many falls occur in the bathroom when stepping in and out of the tub/shower, when one foot is off the ground and balance is compromised. Ideally, your two hand supports will be separated by 10” or more to provide a wide base of support. This is important because:
- Your center of gravity is controlled
- It distributes your weight more evenly
- You maintain your balance as you step or move
- It reduces the likelihood of a slip or a fall
Step 1: Sit vs Stand
- Decide your preference and/or what is the safest method of bathing:
- A bath on the bottom of the tub
- A safe seated shower using a shower seat
- A standing shower
- If you choose to have a bath on the bottom of the tub, what supports do you need to lower down and rise in a safe and controlled manner?
- If you prefer to sit for a safe shower, or you have a progressive condition that will necessitate this at some point, sitting to shower helps reduce fatigue and takes less energy. It also allows you to concentrate on the activities of washing your body or hair without concentrating on maintaining your balance
- Determine the ideal height of the shower seat that makes it easier for you to stand up (typically higher than the back of your knee to give you an ergonomic advantage and make it easier to get up and down. Sit on the seat and practice standing up and sitting down slowly and carefully).
- Remember that you will probably stand up for washing of some body parts and will need to have supports in place for this.
- You will want to have a hand-held shower for a seated shower
Step 2: Confirm the need for one vs two-handed support
- Determine whether you need one-handed support or two-handed support. This will depend on the amount of effort it takes for you to maintain control and balance during your movements in and out of the tub/shower, balance when turning around, ability to sit down or rise from seated. It also depends on whether your legs are strong and can bear weight equally
- If your balance is poor, one side of your body is weak, or both sides are weak, you would be best with two-handed support. The best support is achieved when the two hands are separated by 12” or more. Think of it as your stable base of support. Two hands on one side is NOT a stable base of support.
- Two-handed support can be achieved with multiple supports strategically placed for the variety of activities that you need to do.
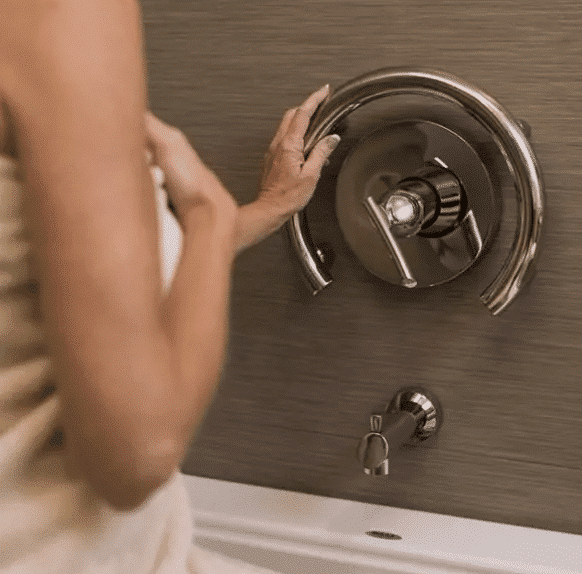
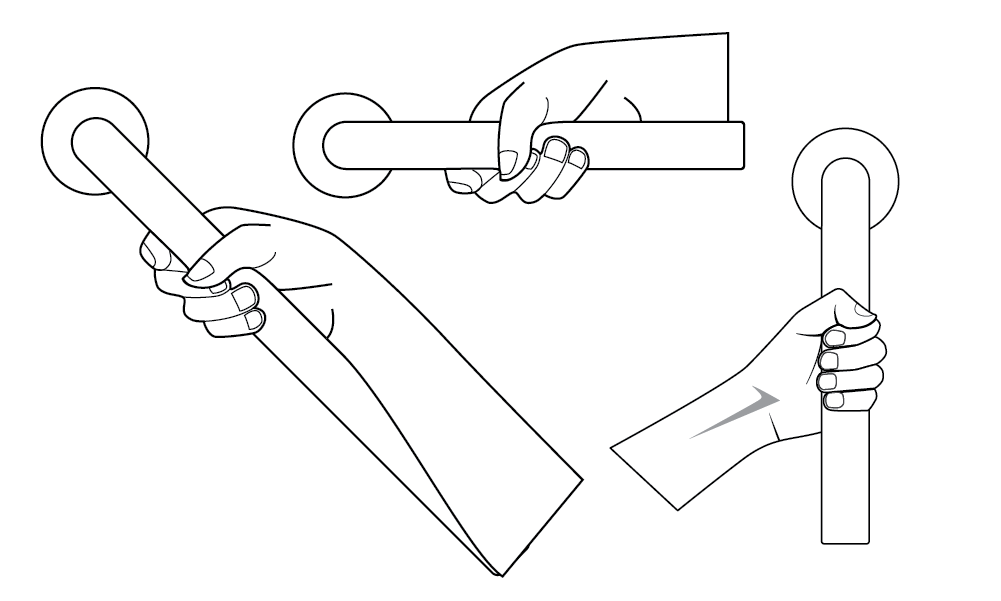
Step 3: Choose Your Ideal Arm and Hand Positions for Grip Strength and Support
If you sit on the bottom of the tub or sit on a shower chair, you will want a grab bar to help you rise from the seated position. Practice standing up and sitting down slowly and carefully. Watch where you place your hands for support or where you would like to have support. Typically, a long diagonal bar is used to get up from the bottom of the tub or a shower seat and is tall enough to provide support in standing.
- Assess your preferred grip position.
- Use the broom handle to simulate a grab bar to answer the following questions:
- What position feels most natural: vertical, horizontal, or on a diagonal (lowest end at your elbow and highest end further away)?
- In what position do you have the strongest grasp or best leverage?
- Assess your preferred reach position.
- Lean forward into a position where you are ready to stand up and then reach comfortably forward. Mark with masking tape where your hand reaches.
- Lean forward until your nose is over your toes so that your weight is directly over your feet. This will help determine where you need a grab bar or support to help you move safely.
- Also consider:
- Do you need to balance lightly on the grab bar or hoist yourself up with a lot of effort?
- Do you need 2-handed support?
- Do you need to lean partially on your forearm for added support?
- Are you stronger when pushing up from a support or pulling yourself up?
- What is your strongest side?
- Can the same grab bar provide support once you come to standing or do you need a different one?
Step 4: Choose the Position for The Other Grab Bars
Keeping in mind the 3-point contact rule, you must decide where to place the other grab bars based on the tasks that you will be doing, and the support needed when doing them.
- Near the water valve
- If you need to lean over the toilet or another obstacle to turn your water on before you enter the shower, do you need support?
- At the entry/exit point of the tub or shower
- If you are stepping over a tub wall, consider having one vertical bar at the threshold as well as a second bar to hold onto while moving into the tub.
- Along the long wall
- If you can reach from the entry/exit grab bar to one on the long wall, this will provide two hand supports while stepping into the tub. If not, consider a bar by the water valve.
- Outside the shower
- As you step out of the shower, typically we are facing forward and need to hold the bar at the entry/exit and then one outside the tub. This is the perfect spot for the towel bar grab bar.
- Non-slip surface in and out
- Ensure you use a non-slip rubber mat or non-slip grip strips on the floor of the tub/shower. Outside the tub/shower, make sure the bathmat does not slip at all when you step on it.
- Mark the wall positions for the grab bars with painter’s tape and perform several practice trials as if the grab bars were in that position.
- If you have an assistant, have them hold a broomstick or handle in the correct position so you can try it out. Move the tape as needed. Even leave the tape in place for a few days if you want to think about it as you use the toilet throughout the days and nights.
- Confirm that the position works for every person in the household who would benefit from using the grab bar.
- For grab bars and fixtures that are mounted to the wall – a vertical or diagonal bar is typically positioned forward of your knees when you are seated if you pull to stand up, no higher than shoulder height – a diagonal bar works well for several people of different sizes or abilities. If you push to stand up, position a horizontal bar at your side.
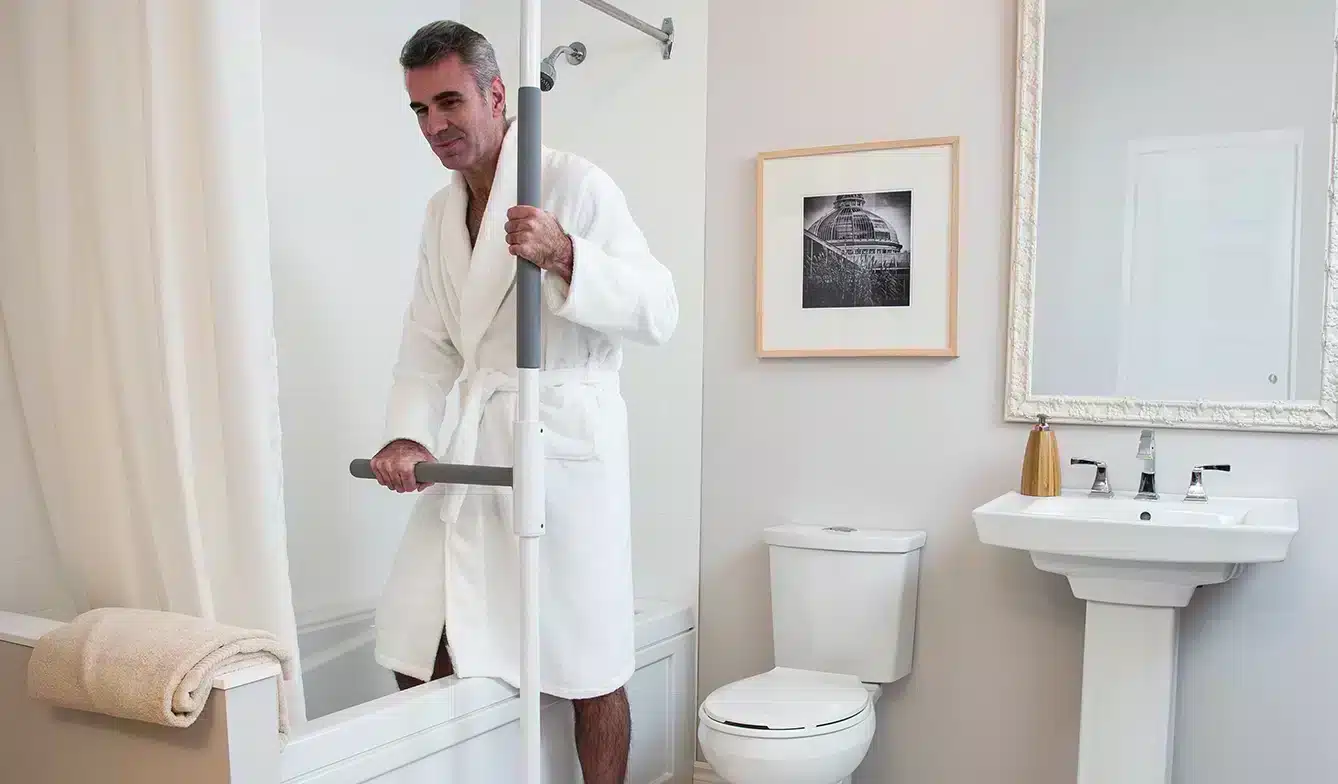
- If you are considering a floor-to-ceiling safety poles, place the broomstick in a vertical position. The horizontal bar should be positioned in front of the body so that both hands can be supported on the bar, or one hand on the bar and one on the vertical pole (stable base of support). The horizontal bar needs to be far enough in front of the body so that there is plenty of room to move forward onto your feet. The horizontal bar can be rotated once you are standing.
Step 5: Install the grab bars securely
-
- Find the studs for mounting the grab bars – for the highest weight capacity install directly into the studs. Or use wall anchors with compatible grab bars to place them anywhere – whether you have drywall, drywall with tile, or fiberglass walls, wall anchors can be installed on all of them.
- HealthCraft has a variety of grab bars that are compatible with the wall anchors – EasyMount Grab bars in 6 different lengths (12”, 18”, 24”, 32”, 36”, 42”) and the Plus Series 2-in-1 bathroom accessories that beautifully incorporate a grab bar plus different accessories such as the shampoo shelf and crescent bar.
- Find the studs for mounting the grab bars – for the highest weight capacity install directly into the studs. Or use wall anchors with compatible grab bars to place them anywhere – whether you have drywall, drywall with tile, or fiberglass walls, wall anchors can be installed on all of them.
-

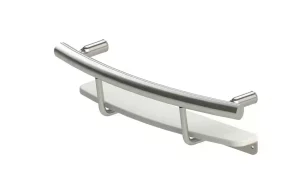
PLUS Shampoo Shelf 16″ + Grab Bar
Shampoo Shelf and Grab Bar 2-In-1, Wall-Mounted Safety For Seniors
USD $84.00 USD $124.00Price range: USD $84.00 through USD $124.00Select options This product has multiple variants. The options may be chosen on the product page -
-

PLUS Corner Shelf + Grab Bar
Make Your Bathroom Stylish & Safe, 2-In-1 ADA Compliant Grab Bar
USD $84.00 USD $129.00Price range: USD $84.00 through USD $129.00Select options This product has multiple variants. The options may be chosen on the product page -
- If you are renovating and you can install wood blocking wherever you need it, grab bars can be installed anywhere. If this is not within your skill set, call an accessibility renovator or remodeler.
- Accessibility renovators are a valuable resource when it comes to remodeling your bathroom to make it beautiful and safe.
- HealthCraft has a variety of luxury grab bars in the Invisia Collection that beautifully incorporate safety with a grab bar and different accessories such the towel bar and the shampoo shelf.
-
INVISIA Shampoo Shelf + Grab Bar
Innovative Design That Combines Safety, Storage and Luxury.
USD $354.00 USD $394.00Price range: USD $354.00 through USD $394.00Select options This product has multiple variants. The options may be chosen on the product page -
-
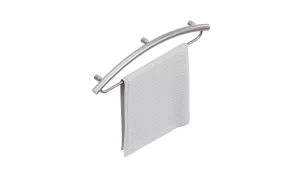
INVISIA Towel Bar + Grab Bar (16″/ 24″)
Towel Bar with Integrated ADA Compliant Grab Bar for Bathroom Safety
USD $254.00 USD $314.00Price range: USD $254.00 through USD $314.00Select options This product has multiple variants. The options may be chosen on the product page -
There you have it, in 5 easy steps you have made toileting safer for you and your family. If you are worried about yourself or a loved one falling in the home, then take our fall risk assessment and get the insight you need to make your living space safer.